Using a custom RTMP stream/recording integration in the Pexip app
You can stream a Pexip conference to a range of third-party streaming and recording services and then share links to that conference to any people who are not actively participating in the call.
This article explains how to set up a custom RTMP stream/recording integration in the Pexip web app and how to schedule and record a conference, and then how to manage those recordings. You may also need to refer to our related articles that describe how to set up your custom RTMP links for your specific streaming service.
Enabling custom RTMP integration
Before you can schedule any custom RTMP recordings you must first enable your account for custom RTMP integration via the Pexip web app:
- Go to pexip.me and log in with your account.
-
Select the
 menu in the top-right corner of the Pexip web app and select .
If the option is not available, contact your account manager at your local certified Pexip Partner to enable you for RTMP or YouTube streaming & recording integration.

-
Select on Custom (RTMP).

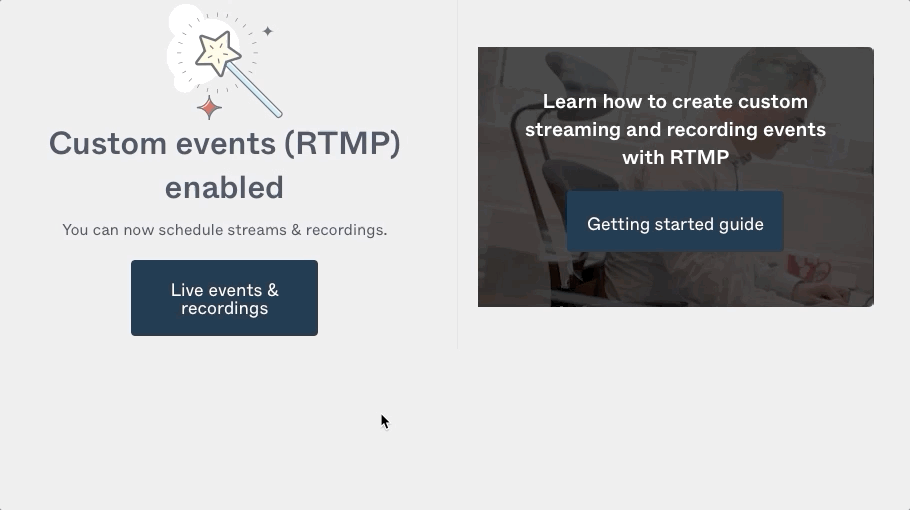
- You'll see a confirmation page stating Custom events (RTMP) enabled.
-
You can now select to go to the live event scheduling page.
After you have set up your integration you can then stream
Scheduling an event via the Pexip web app
Scheduling an event is useful if you want to share a link in advance with your streaming

To schedule a custom RTMP event/recording in advance:
- Go to pexip.me and log in with your account.
- Select the menu in the top-right corner of the Pexip app and select .
-
Select .
- If you’ve enabled YouTube for live events and recording, you’ll need to select before you can select which VMR you want to use.
- If YouTube has not been enabled, selecting takes you directly to the room selection page.
- If you can control more than one VMR you need to select which room you want to stream/record and select .
-
Select the Date and Time for the event. Enter a Title and changes. When done, click .
The list shows you if the room has been booked for any streaming/recording events by anyone else, or if you’ve booked any other stream/recording events on the same day.
-
The next page, , asks you for the following items:
- Server or stream URL: this is your RTMP link from your streaming platform's encoder setup page.
- Stream name or key: this is the name/key, if applicable, from your streaming platform's encoder setup page.
- Player link (optional): a link to share with your streaming/recording audience.
- Recording link (optional): a link to share to the recording when the event is over.
Copy and paste your RTMP link and enter any other optional or applicable items.
If you don't have an RTMP link, you can refer to our related articles that describe how to set up your custom streaming/recording (RTMP) links for your specific streaming service.
- Select .
- You are redirected to a page where you can find your scheduled event’s links/information for meeting participants and live streaming audience.
A scheduled event does not automatically start recording/streaming. You still have to manually start

Starting and stopping a recording
When you have set up a stream/recording integration, you can create, start and stop your scheduled recordings from within the Pexip app for your VMR (or any other VMR that you control), and you can also perform ad hoc streaming and recording while you are in a call.
Starting a scheduled recording from the Pexip web app (before the meeting starts)
You can use the Pexip web app to start and stop a scheduled recording prior to the meeting:
-
Go to pexip.me and when you are ready to start the recording of the meeting, select .
During the setup process the VMR will start connecting to
It might take a minute or two for the recording to begin. There will also typically be a 10-30 second delay between what you see in the room and what you see in the stream.

-
When you are done, select .

- Select to find the link to your recording.
Starting a scheduled recording from the Pexip desktop app
You can also use the Pexip desktop app to start and stop a scheduled recording, either from within the VMR or without joining if there are other participants currently in the VMR:
- Open the participants list
 .
. -
Select .

-
When you are done, select .

Ad hoc streaming and recording (from within the meeting)
You can perform ad hoc streaming and recording from within the Pexip web app or the Pexip desktop app. To start and stop an ad hoc recording while you are in a meeting:
- Open the participants list .
-
Select .

-
If you have enabled YouTube and custom RTMP integrations you are asked to select which type of integration you want to use.

This step is skipped if you only have one integration enabled.
-
If you select a custom RTMP integration you must enter the ingest URL details:
- Server or stream URL: this is your RTMP link from your streaming platform's encoder setup page.
- Stream name or key: this is the name/key, if applicable, from your streaming platform's encoder setup page.
- Player link (optional): a link to share with your streaming/recording audience.
- Recording link (optional): a link to share to the recording when the event is over.
Copy and paste your RTMP link and enter any other optional or applicable items.
If you don't have an RTMP link, you can refer to our related articles that describe how to set up your custom streaming/recording (RTMP) links for your specific streaming service.
-
Select .

-
The stream is initiated and the VMR starts connecting to

... and then becomes live.
It might take a minute or two for the recording to begin. There is also typically a 10-30 second delay between what you see in the room and what you see in the stream.
-
When you are done, select .
A Stopping stream/recording message is displayed, followed by Stream/recording stopped.
-
You can select to remove the message or to find the link to your recording.


Managing past and future events
You use the option within MyPages to schedule new events, see which events you have already scheduled, and to review all of your past events (both scheduled and ad hoc).
For each past and future event you can access links to that conference for sharing with your colleagues, and review the recordings of completed conferences.
